
In this article, I will document how I connected my AirPods to my computer running Arch Linux with PulseAudio.
While I first thought that it would be quite laborious since Apple is not known for worrying about compatibility with platforms other than Apple devices, it turned out that connecting Airpods is not really different from connecting other bluetooth devices.
Prerequisites
In this tutorial, I will use bluetoothctl and pulseaudio. If you do not have a sound multiplexer installed, I recommend going through the Arch Linux wiki page on installing and configuring PulseAudio.
You will also need to have the bluez package installed, which should provide your computer with Bluetooth utilities.
Once you have BlueZ and PulseAudio installed and configured, you will need to install pulseaudio-alsa which provides compability between ALSA and PulseAudio, pulseaudio-bluetooth for bluetooth support with PulseAudio and finally bluez-utils providing the bluetoothctl CLI tool interact with the bluetooth service.
1
> pacman -S pulseaudio-alsa pulseaudio-bluetooth bluez-utils
Pairing and connecting your Airpods with bluetoothctl
First of all, you need to start the bluetooth systemd service and kill any existing PulseAudio instance.
1
2
> systemctl start bluetooth.service
> pulseaudio -k
Now that the bluetooth service is running, you can run the bluetoothctl command and enter its command prompt.
1
2
3
4
5
6
7
8
9
> bluetoothctl
[bluetooth]# power on
Changing power on succeeded
[bluetooth]# agent on
Agent registered
[bluetooth]# default-agent
Default agent request successful
[bluetooth]# scan on
Discovery started
At this point your bluetooth pairing agent should be in discovery mode. It means that your computer is ready to connect to your AirPods.
For your AirPods to be discovered by bluetoothctl, you will need to put them into bluetooth pairing mode. With your AirPods in their charging case, open the lid of the charging case and keep the button on the back of the case pressed until the status light flashes white. The white light means that your AirPods are now in pairing mode, which means that if you look back to the bluetoothctl command prompt, there should be a new line with the MAC address and the name of your AirPods:
1
[NEW] Device B8:5D:0A:52:EF:86 AirPods
Now that your AirPods have been discovered, you can pair them and connect them with your computer using their MAC address:
1
2
3
4
5
6
7
[bluetooth]# pair B8:5D:0A:52:EF:86
Attempting to pair with B8:5D:0A:52:EF:86
(...)
Pairing successful
[bluetooth]# connect B8:5D:0A:52:EF:86
Attempting to connect to B8:5D:0A:52:EF:86
Connection successful
Your AirPods should now be connected to your computer !
To automatically connect to your AirPods in the future, you can trust the device by running:
1
2
[AirPods]# trust B8:5D:0A:52:EF:86
Changing B8:5D:0A:52:EF:86 trust succeeded
You can also change the name of your AirPods by using the bluetoothctl set-alias command:
1
2
3
[AirPods]# set-alias "AirPods de Jean Michel"
[CHG] Device B8:5D:0A:52:EF:86 Alias: AirPods de Jean Michel
Changing AirPods de Jean Michel succeeded
Now if you open the PulseAudio sound control panel pavucontrol you should see your AirPods in the “Output devices” tab below your default internal audio device.
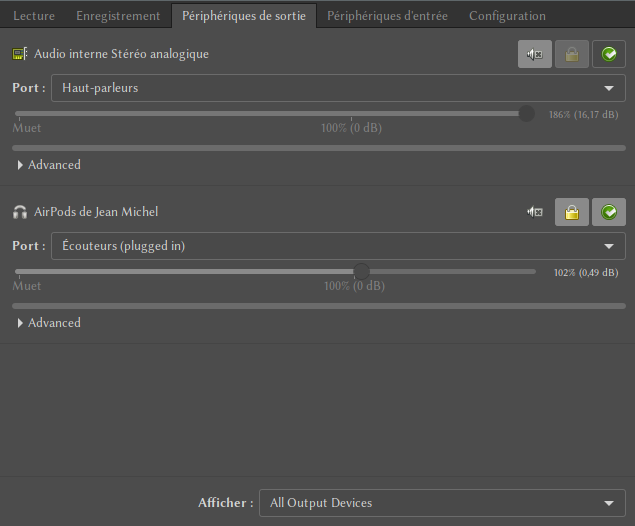
If the Airpods don’t show in the control panel, the issue might be that you haven’t installed the pulseaudio-bluetooth module.
Conclusion
Now you should have your AirPods working ! As you can see, connecting your AirPods to a Linux device does not require any specific configuration other than standard bluetooth connection tools.
I hope that this short tutorial can be useful for those of you with AirPods who didn’t know how to connect them with your Arch Linux machine.
If you need any specific troubleshooting solutions, I highly recommand you going to the Arch Linux wiki, especially to the Bluetooth headset page, which is quite complete and from which I learned a lot of what I mentioned in this article.